
How to remove scratches from sunglass lenses

How to remove scratches from sunglass lenses sounds simple until the wrong trick turns a tiny mark into a cloudy mess. Scratched shades can be annoying because they sit right in your line of sight, catch sunlight at weird angles, and make a favorite pair feel worn out too soon. Still, not every scratch deserves the same treatment, and honestly, some lenses are better left alone than rubbed raw with kitchen cabinet hacks. The smarter move is to check the lens material, look at the coating, and decide whether a gentle clean, a cautious polish, or a replacement lens makes more sense.
Lens coatings are the big wrinkle here, because many sunglasses have tint layers, mirror finishes, polarization films, anti-glare treatments, or UV coatings that don’t enjoy aggressive polishing. A faint surface scuff on plain plastic may respond differently than a scratch across a polarized lens with a reflective finish. So, before grabbing toothpaste, baking soda, or any gritty paste, slow down and clean the lenses with lukewarm water and a tiny drop of mild dish soap. That simple wash often removes dust, sunscreen, skin oil, and dried salt that can make a lens look more scratched than it really is.
Microfiber cloths matter more than people think, because paper towels, shirt hems, napkins, and rough cleaning wipes can add tiny swirl marks. After rinsing, pat the lenses dry instead of grinding debris across the surface. Then hold the sunglasses under soft light and tilt them slowly to see whether the mark is dirt, coating damage, or a true groove. If your fingernail catches in the scratch, well, that’s usually a sign the damage is deeper than a home polish can safely fix.
Plastic sunglass lenses sometimes allow careful cosmetic improvement, but the goal should be reducing visibility, not making the lens brand new. A lens-safe plastic polish may help with light scuffs, though it should be tested in a tiny corner first. Use gentle circular motions, barely any pressure, and stop fast if the surface gets hazy. Pushing harder won’t speed things up, and that’s where a quick fix can go sideways.
Glass lenses are a different story because they’re harder, less forgiving, and not friendly to casual buffing. Deep scratches in glass usually need professional attention or replacement, especially if they affect vision. The same goes for scratched polarized sunglasses, mirrored lenses, or prescription sunglasses, since the coating may be the part that’s damaged. In that case, chasing the scratch can strip the finish and leave a larger dull patch than the original problem.
Scratch prevention does the heavy lifting after the first repair attempt. Store sunglasses in a hard case, rinse beach grit before wiping, keep them lens-side up, and avoid tossing them into a bag with keys or metal zippers. Small habits sound boring, sure, but they save lenses from the daily rough-and-tumble that causes most marks. With the right approach, how to remove scratches from sunglass lenses becomes less about risky shortcuts and more about protecting clarity without wrecking the coating.

- TLR Rank10.0
TLR Rank is a ranking system developed by TravelLuggageReviews.com. TLR Rank has no relationship or impact from any manufacturers or sales agent websites. Learn more
- BrandBenicabaly

- TLR Rank10.0
TLR Rank is a ranking system developed by TravelLuggageReviews.com. TLR Rank has no relationship or impact from any manufacturers or sales agent websites. Learn more
- BrandYPZVX

- TLR Rank10.0
TLR Rank is a ranking system developed by TravelLuggageReviews.com. TLR Rank has no relationship or impact from any manufacturers or sales agent websites. Learn more
- BrandGeneric
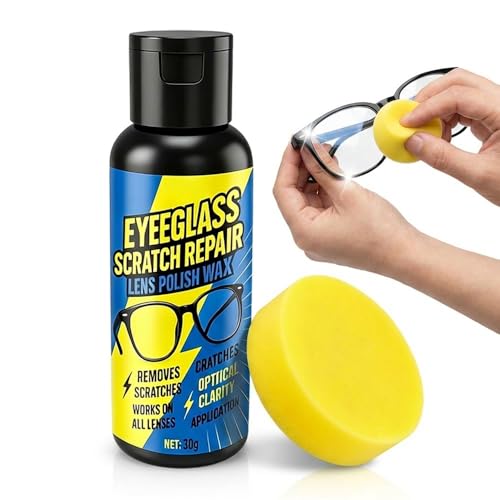
- TLR Rank10.0
TLR Rank is a ranking system developed by TravelLuggageReviews.com. TLR Rank has no relationship or impact from any manufacturers or sales agent websites. Learn more
- BrandShellfairy

- TLR Rank10.0
TLR Rank is a ranking system developed by TravelLuggageReviews.com. TLR Rank has no relationship or impact from any manufacturers or sales agent websites. Learn more
- BrandGeneric

- TLR Rank10.0
TLR Rank is a ranking system developed by TravelLuggageReviews.com. TLR Rank has no relationship or impact from any manufacturers or sales agent websites. Learn more
- BrandQiwagFerng

- TLR Rank8.6
TLR Rank is a ranking system developed by TravelLuggageReviews.com. TLR Rank has no relationship or impact from any manufacturers or sales agent websites. Learn more
- BrandNovus

- TLR Rank7.2
TLR Rank is a ranking system developed by TravelLuggageReviews.com. TLR Rank has no relationship or impact from any manufacturers or sales agent websites. Learn more
- BrandZ Clear

- TLR Rank4.8
TLR Rank is a ranking system developed by TravelLuggageReviews.com. TLR Rank has no relationship or impact from any manufacturers or sales agent websites. Learn more
- BrandGeneric
- TLR Rank3.6
TLR Rank is a ranking system developed by TravelLuggageReviews.com. TLR Rank has no relationship or impact from any manufacturers or sales agent websites. Learn more
- BrandGeneric
Last update on 2026-08-02 / Affiliate links / Images, Product Titles, and Product Highlights from Amazon Product Advertising API
How To Remove Scratches From Sunglass Lenses
A tiny mark across your favorite shades can feel ridiculous, right until the sun hits it and throws a bright streak straight into your view. That annoyance is exactly why how to remove scratches from sunglass lenses needs a careful, practical approach instead of a random kitchen hack. Some scratches are only surface scuffs, some are damaged coatings, and some are deep grooves that won’t behave no matter how gently you rub. The trick is knowing the difference before a small flaw turns into cloudy lenses, stripped tint, or a ruined polarized finish.
Scratch Fix For Sunglass Lenses
How to remove scratches from sunglass lenses starts with one boring but crucial step: clean the lenses before judging the damage. Dust, sunscreen, dried sweat, salt spray, and skin oil can sit in tiny lines and make them look worse than they are. Rinse the lenses with lukewarm water, add a tiny drop of mild dish soap, then use your fingers lightly instead of scrubbing with pressure. After that, pat dry with a clean microfiber cloth, because paper towels and shirt hems can add fresh marks.
Good light tells the truth better than panic does. Hold the sunglasses near a window or under a soft lamp, then tilt them slowly until the scratch catches the light. A mark that disappears after cleaning was probably residue, not real lens damage. A scratch that stays visible from several angles needs a slower plan, especially if the lenses have polarization, mirror coating, anti-reflective treatment, or prescription correction.
Run a fingernail lightly across the mark, but don’t dig into it. If the nail catches, the scratch is probably deeper than a safe home repair can handle. That’s the point where polishing may blur the surrounding area instead of improving the line. For shallow surface marks, a lens-safe plastic polish may reduce visibility, but it should never be treated like magic.
Many popular home tricks sound cheap and clever, but they can be a mess on sunglasses. Toothpaste, baking soda paste, car wax, furniture polish, and abrasive cleaners may dull coatings or leave a smeared patch that’s harder to ignore than the original scratch. The safer mindset is simple: preserve lens clarity first, chase cosmetic improvement second. Sunglasses protect your eyes and sharpen comfort outdoors, so the repair should never trade visibility for a shiny-looking shortcut.
Why Lens Material Changes The Repair Plan
Plastic lenses and glass lenses don’t respond the same way to scratches. Plastic is softer, so it scratches more easily, but very light surface scuffs may sometimes be improved with careful polishing. Glass resists small scratches better, yet once it gets marked, at-home buffing usually won’t do much without special equipment. That difference matters because a method that mildly helps one lens can leave another looking hazy.
Polycarbonate lenses are common because they’re light, impact resistant, and comfortable for long wear. The catch is that many rely on coatings for scratch resistance, tint, UV filtering, or glare control. If the coating is what got scratched, polishing may remove more of it and create a dull halo around the damaged spot. That’s why coating damage often looks worse after aggressive rubbing.
Polarized sunglasses need extra caution because the glare-filtering layer can be part of the lens structure or coating system. A scratched polarized lens may show odd rainbow patterns, blurry streaks, or patchy glare reduction. In that situation, the issue isn’t just looks; it can affect driving comfort, water visibility, and everyday eye strain. For expensive or prescription pairs, replacing the lens is often a smarter move than gambling with polarized lens repair.
Travel sunglasses take a beating because they move through bags, airports, beaches, rental cars, and hotel nightstands. Before a long trip, pack them in a hard case instead of sliding them into a side pocket with chargers or keys. For smarter packing around eyewear, clothing, and daily essentials, plan your luggage space with what size suitcase for 2 weeks so delicate items don’t get crushed under heavier gear. Small packing choices can save a lens from weeks of annoying glare lines.
Safe Cleaning Before Any Scratch Treatment
Safe scratch repair begins with removing grit, not rubbing it around. Sand, dust, and tiny debris behave like sandpaper once trapped under a cloth. Rinse both sides of the lenses first, even if they don’t look dirty. That one habit cuts down on fresh micro-scratches and keeps the repair process from getting off on the wrong foot.
Use mild dish soap only, not hand soap with lotion, citrus oils, exfoliating beads, or strong fragrance. Those extras can leave residue or interact badly with lens coatings. Massage the soap gently across the lens surface, nose bridge, and frame edges where grime builds up. Then rinse thoroughly, because leftover soap can dry into a film that looks like lens haze.
Drying deserves the same care as washing. Press the microfiber cloth lightly instead of dragging it hard across the surface. If the cloth has been sitting loose in a drawer or backpack, wash it first or use a clean one. A dirty microfiber cloth can hold tiny particles, and those particles can make scratch prevention harder than it needs to be.
After cleaning, inspect the sunglasses again and separate the scratch from general wear. A single fine line near the edge may be tolerable, while a central scratch across the pupil area can become distracting fast. Sunglasses used for driving, fishing, cycling, or outdoor work need clearer lenses than a backup pair kept for short errands. That realistic lens-by-lens judgment helps you avoid over-fixing something that doesn’t actually hurt daily visibility.
Careful Options For Light Surface Scratches
Light surface scratches on some plastic sunglass lenses may be softened with a product made for plastic polishing. Use a tiny amount, work in gentle circles, and keep the pressure low. Test a small area near the edge first, because a bad reaction there is less painful than a cloudy patch in the center. Stop immediately if the finish turns dull, sticky, or uneven.
A good repair attempt should feel slow and controlled, not like sanding a tabletop. Buff for a short time, wipe clean, inspect, and repeat only if the lens still looks stable. More pressure doesn’t mean better results; it often means more heat, more friction, and more coating loss. The best outcome is usually reduced scratch visibility, not a lens that looks fresh from the store.
Avoid using toothpaste unless you’re prepared for the risk. Many toothpastes contain abrasives designed for enamel, not delicate lens coatings. Even “gentle” formulas can leave fine haze on tinted or mirrored sunglasses. For mirrored lenses, that haze can spread unevenly and make the surface look rubbed, which is a tough tradeoff for one small scratch.
Kids’ camp gear, sports bags, and weekend duffles are rough places for sunglasses because everything gets tossed together in a hurry. If eyewear rides alongside water bottles, flashlights, toiletries, and snack wrappers, a hard case becomes non-negotiable. For packing setups where soft bags make more sense than rolling luggage, choose storage with structure by comparing best duffle bags for sleep away camp and keeping glasses in a separate protected pocket. That simple barrier prevents the kind of random scuffs no polish handles well.
What To Skip If You Care About Clear Vision
Abrasive household fixes are the fastest way to make sunglasses look tired. Baking soda paste can seem harmless because it’s common and cheap, but it still works by abrasion. That means it may remove or rough up the very coating that gives the lens its tint, glare control, or scratch resistance. Once the coating gets patchy, the lens usually won’t look even again.
Car wax and furniture polish bring a different problem. They may temporarily fill tiny marks, but they can leave residue that smears under heat, sweat, or humidity. Sunglasses sit close to the face, so oily film and chemical smells aren’t just annoying; they’re uncomfortable. A repair that needs constant reapplication isn’t really fixing scratched sunglasses.
Strong solvents should stay far away from sunglass lenses. Acetone, alcohol-heavy cleaners, ammonia sprays, and harsh degreasers can attack coatings or frame finishes. Even if the lens survives, nose pads and frame materials may not. A safer repair keeps the whole pair in mind, not just the scratched spot.
Prescription sunglasses deserve the most restraint because the lens is doing more than blocking sunlight. A scratch across a prescription lens can distort vision, create glare, or make the eyes work harder. For larger frames with vision correction, lens replacement may be the cleanest route, especially with prescription oversized sunglasses where the lens area catches more light and makes flaws easier to notice. Protecting sharp vision matters more than forcing a risky polish to save a damaged surface.
Safe Ways To Fix Scratched Sunglass Lenses At Home
A scratch that sits near the center of a lens can wear on your patience fast, especially during driving, beach days, or quick errands in bright glare. The real goal isn’t to make scratched sunglass lenses look brand new by force, because that’s where coatings get ruined. A better plan is to reduce distraction, protect clear vision, and know when a repair attempt is no longer worth the risk. That practical mindset keeps how to remove scratches from sunglass lenses simple, safer, and less likely to turn one mark into a larger cloudy patch.
Decide If The Scratch Is Worth Treating
Start by asking where the scratch sits, because location changes everything. A faint line near the outer edge may not bother your eyes much, while a mark in the center can catch light all day. If the scratch interrupts driving visibility or makes you squint, treat it as more than a cosmetic problem. Comfort matters, but eye strain matters more.
Depth tells you whether a home method has a fair shot. A scratch you can barely feel may respond to gentle cleaning or a lens-safe polish on some plastic lenses. A groove that catches your fingernail usually means the material has been cut too deeply. At that point, lens replacement beats repeated rubbing.
Coating damage can be sneaky because it doesn’t always look like a clean scratch. It may appear as a cloudy streak, peeling edge, rainbow patch, or dull spot. Trying to polish that area can remove more coating and make the lens look uneven. That’s why polarized lenses, mirrored lenses, and prescription sunglasses deserve extra caution.
Daily habits can also explain why the scratch happened in the first place. Sunglasses tossed into backpacks, glove boxes, stroller baskets, or travel bags often rub against keys, chargers, and snack wrappers. Families packing for trips may protect eyewear better by giving glasses their own case, especially around kids’ gear like a scooter suitcase where toys and hard edges can bump into delicate lenses. A simple storage change can prevent the same headache from coming back.
Use Gentle Repair Methods Without Overdoing It
A gentle approach works better than a dramatic one. After cleaning, place the sunglasses on a soft towel and work in a calm, steady way. Use only a tiny amount of plastic-safe polish if the lens type allows it. The pressure should feel light enough that you’re guiding the cloth, not grinding the surface.
Short sessions are safer than one long buffing session. Rub lightly for a few seconds, wipe the lens clean, then inspect it under soft light. If the area starts looking dull, stop right away. A small improvement is still a win if it preserves lens clarity.
Skip anything gritty unless the lens maker specifically says it’s safe. Toothpaste and baking soda can feel tempting because they’re already in the house, but they work by abrasion. That abrasion may shave down coatings along with the scratch. For sunglasses, less friction usually means fewer regrets.
Don’t chase perfection on an old pair that already has worn coatings. A repair can make a faint scratch less distracting, but it won’t rebuild tint, UV coating, mirror finish, or polarization. If the lenses look patchy after cleaning, replacement is probably the cleaner path. That choice protects visual comfort instead of stretching a damaged lens past its limit.
Protect Coated And Oversized Sunglasses Better
Large lenses look stylish, but they also expose more surface area to scratches. Bigger frames touch tables more easily, slide around in bags, and pick up fingerprints near the edges. A wide lens can make one scuff feel more obvious because sunlight has more room to bounce across it. That’s why oversized sunglasses need better storage habits than a small backup pair.
Frame color and lens finish can change how visible scratches appear. Darker lenses may hide tiny marks indoors, then reveal them sharply outside. Brown and gradient lenses can be especially noticeable if a scratch cuts through the tint pattern. For style-focused eyewear, a protective case matters even more with pieces like brown oversized square sunglasses because the broad lens shape can show smudges and scuffs quickly.
Never place sunglasses lens-side down, even for a minute. Counters, patio tables, car consoles, and bathroom sinks often hold tiny grit that you can’t see. Set them upside down on the folded temples or put them straight into a case. That tiny habit protects scratch-resistant coatings from daily wear.
Heat can make lens problems worse, too. Leaving sunglasses on the dashboard may stress frames, soften coatings, or make existing damage more noticeable. A hot car can turn a mild lens issue into a warped, uncomfortable fit. Keep sunglasses in a shaded case whenever possible to protect frame shape and lens finish.
Know When Replacement Beats Repair
Replacement sounds annoying, but sometimes it’s the most sensible fix. If a scratch sits directly in your line of sight, every repair attempt carries a risk of making the lens more distorted. Polishing can flatten nearby areas unevenly and create a blurry spot. For driving or outdoor work, clean vision should outrank saving a scratched lens.
Prescription sunglasses need an even stricter rule. Any change to the lens surface may affect how your eyes focus through the prescription. A scratch may seem small, but blur, glare, and distortion can build up over a full day. In that case, professional lens replacement is usually safer than experimenting.
Mirrored finishes rarely forgive DIY polishing. Once the reflective coating gets scratched, rubbing may spread the damage and leave a dull silver or gray patch. The lens might still block light, but it won’t look even anymore. For mirrored sunglasses, coating preservation matters more than trying to erase every mark.
Cost also plays a role. A cheap backup pair may not deserve paid repair, while a well-fitting frame or prescription pair might be worth new lenses. Think about comfort, fit, lens quality, and how often you wear them. The best choice is the one that restores daily usability without creating more damage.
Build Habits That Keep Lenses Clear Longer
Prevention starts before the lenses look dirty. Rinse dust and grit away before wiping, especially after beach trips, hiking, gardening, or windy days. A dry wipe may feel quick, but it can drag tiny particles across the lens. Water and a clean microfiber cloth protect scratch-free lenses far better.
Keep one microfiber cloth in the case and wash it regularly. A cloth full of old dust, face oil, and sunscreen isn’t really clean anymore. Use mild soap, rinse it well, and let it air dry without fabric softener. That keeps lens cleaning simple and safe.
Storage should be boring, sturdy, and automatic. A hard case beats a soft pouch if your sunglasses ride in a bag, suitcase, glove box, or sports backpack. Soft pouches stop fingerprints, but they don’t protect against pressure from harder items. A case with structure helps prevent bent frames and scratched lenses at the same time.
Small routines make the biggest difference over months of wear. Put sunglasses in the same place when you get home, avoid balancing them on your head for hours, and never clean them with a napkin at a restaurant. Those little choices don’t feel fancy, but they stop most common scratches before they happen. That’s the quiet win behind how to remove scratches from sunglass lenses: the best repair is needing fewer repairs in the first place.


11 Best Black Friday Sunglasses Deals of 2026 Built to Last

10 Best Cycling Sunglasses of 2026 For Wind Defense and Zero Slip

11 Best Mens Polarized Sunglasses of 2026 For Glare-Free Driving

10 Best Polarized Fishing Sunglasses of 2026 To Cut Water Glare

11 Best Smith Sunglasses of 2026 For Water and Trail

10 Best Carrera Sunglasses of 2026 for the Right Fit

11 Best Versace Sunglasses of 2026 For a Flattering Fit

11 Best Gucci Sunglasses of 2026 For Flattering Fit and Comfort









